btnBrowser = (Button) findViewById(R.id.btnBrowser);
  btnBrowser.setOnClickListener(new OnClickListener() {

   @Override
   public void onClick(View arg0) {
    intent = new Intent(Intent.ACTION_VIEW);
    intent.setData(Uri.parse("http://google.com.vn"));
    startActivity(intent);
   }
  });
  btnSearch = (Button) findViewById(R.id.btnSearch);
  btnSearch.setOnClickListener(new OnClickListener() {

   @Override
   public void onClick(View v) {
    intent = new Intent(Intent.ACTION_WEB_SEARCH);
    intent.putExtra(SearchManager.QUERY, "abc");
    startActivity(intent);
   }
  });
  btnDial = (Button) findViewById(R.id.btnDial);
  btnDial.setOnClickListener(new OnClickListener() {

   @Override
   public void onClick(View v) {
    intent = new Intent(Intent.ACTION_CALL);
    intent.setData(Uri.parse("tel:1234567890"));
    startActivity(intent);
   }
  });
  btnShowPicture = (Button) findViewById(R.id.btnShowPicture);
  btnShowPicture.setOnClickListener(new OnClickListener() {

   @Override
   public void onClick(View v) {
    intent = new Intent(
      Intent.ACTION_PICK,
      android.provider.MediaStore.Images.Media.INTERNAL_CONTENT_URI);
    startActivity(intent);
   }
  });
  btnGoContact = (Button) findViewById(R.id.btnGoContact);
  btnGoContact.setOnClickListener(new OnClickListener() {

   @Override
   public void onClick(View v) {
    intent = new Intent(Intent.ACTION_PICK,
      ContactsContract.Contacts.CONTENT_URI);
    startActivity(intent);
   }
  });
  btnInsertContact = (Button) findViewById(R.id.btnInsertContact);
  btnInsertContact.setOnClickListener(new OnClickListener() {

   @Override
   public void onClick(View v) {
    intent = new Intent(Intent.ACTION_INSERT,
      ContactsContract.Contacts.CONTENT_URI);
    intent.putExtra(ContactsContract.Intents.Insert.NAME, "Tien");
    intent.putExtra(ContactsContract.Intents.Insert.EMAIL,
      "tienlbhoc@gmail.com");
    intent.putExtra(ContactsContract.Intents.Insert.PHONE,
      "01234567890");
    startActivity(intent);
   }
  });

  btnSendSMS = (Button) findViewById(R.id.btnSendSMS);
  btnSendSMS.setOnClickListener(new OnClickListener() {

   @Override
   public void onClick(View v) {
    intent = new Intent(Intent.ACTION_VIEW);
                intent.setData(Uri.parse("sms:"));
                intent.setType("vnd.android-dir/mms-sms");
                intent.putExtra("sms_body", "Here you can set the SMS text to be sent");
                intent.putExtra("address",  "1234567890");
                startActivity(intent);
   }
  });

  btnSendEmail = (Button) findViewById(R.id.btnSendEmail);
  btnSendEmail.setOnClickListener(new OnClickListener() {

   @Override
   public void onClick(View v) {
    intent = new Intent(Intent.ACTION_SEND);
    intent.setType("text/html");
    intent.putExtra(Intent.EXTRA_EMAIL, "tienlbhoc@gmail.com");
    intent.putExtra(Intent.EXTRA_SUBJECT, "Subject");
    intent.putExtra(Intent.EXTRA_TEXT, "I'm email body.");

    startActivity(Intent.createChooser(intent, "Send Email"));
   }
  });
Showing posts with label Open source. Show all posts
Showing posts with label Open source. Show all posts
Monday, 20 January 2014
Some popular implicit intents in Android
When coding Android, we must do very much with intent (Explicit and implicit) to start activities and applications. Below are some popular implicit intent to start some work like open webbrowser, send mail, sms, open/add contact .... Hoping useful for you.

Wednesday, 1 January 2014
Netbeans or Eclipse IDE for code
I am a fan of Netbeans. And in this article, I will tell about why I prefer Netbeans to Eclipse.
Netbeans is owned by Oracle
With java developer, Netbeans is owned by Oracle (Oracle is owner of java too), so we can be confident in its future development and support. In present, many support document can be found in Netbeans and Oracle website. Example:
Java EE & Java Web Learning Trail
https://netbeans.org/kb/trails/java-ee.html
Creating a RESTful Web Service Using NetBeans IDE
http://docs.oracle.com/cd/E19226-01/820-7627/giqaa/index.html
Many default good plugins/functions
Undeniably Eclipse has a lot of plugins and extensions. But many of them are not as good as Netbeans plugins/functions or must pay to use.
When I coding java, javascript, php, c/c++, html5. Netbeans is better and easier than Eclipse, Aptana (Eclipse plugin for code web) and more stable.
But with python (use pydev) or Android (adt) and many languages out of default in Netbeans, Eclipse plugins are better. But java (all feature), web, php, c++ are almost full for me, Android now is changing to android studio and with pydev, I use pycharm, Eclipse is only a secondary IDE of them.
Easy for install and more compatibility
Netbeans has full functions like tomcat, glassfish servers for web and newest features, drag and drop GUI function in install file, embed webkit to debug, javascript, templates,libs (like jquery) for php, java, javascript ... install process in Linux or Windows has wizard (very modern).
In Eclipse, only download, extract and use (with minimum demand) but need download and install server, GUI drag drop plugin for java swing plugins (must pay), and ....
Netbeans and eclipse need install jdk first but Netbeans has "Netbeans with jdk" version in Oracle website.
In ubuntu with unity, Netbeans support create launcher and stick to unity, eclipse error with menu.
 Can fix it but I don't like must search google and fix every install.
Autocomplete and support code
Eclipse support autocomplete too but not as good as Netbeans. See follow.
Autocomplete expression language don't show in Eclipse but Netbeans has:

Netbeans support many shortcut key and template code better than Eclipse.
When I coding, I often use:
psvm<tab> to print lines:
sout<tab> to System.out.println("");
fori<tab> to for an array
forl<tab> to for an list
form<tab> to for a map
or for + ctrl space to select or view shortcut at the right.

view more in Help -> Keyboard shortcuts card.
With Eclipse, we can only do with for and ctrl+space and enter or select .
And Netbeans has some other advanced like:

In dotnet, visual studio is the best comfortable IDE , and in java, you can see image of it in Netbeans (and more).
Stable
I use Netbeans for code java, web and Eclipse for code Android. And I think Netbeans more stable than Eclipse.
Lightweight
In the past, Eclipse is more lightweight than Netbeans, but now, Eclipse is the same and after install some plugin, it is really heavy and not stable.
Netbeans is owned by Oracle
With java developer, Netbeans is owned by Oracle (Oracle is owner of java too), so we can be confident in its future development and support. In present, many support document can be found in Netbeans and Oracle website. Example:
Java EE & Java Web Learning Trail
https://netbeans.org/kb/trails/java-ee.html
Creating a RESTful Web Service Using NetBeans IDE
http://docs.oracle.com/cd/E19226-01/820-7627/giqaa/index.html
Many default good plugins/functions
Undeniably Eclipse has a lot of plugins and extensions. But many of them are not as good as Netbeans plugins/functions or must pay to use.
When I coding java, javascript, php, c/c++, html5. Netbeans is better and easier than Eclipse, Aptana (Eclipse plugin for code web) and more stable.
But with python (use pydev) or Android (adt) and many languages out of default in Netbeans, Eclipse plugins are better. But java (all feature), web, php, c++ are almost full for me, Android now is changing to android studio and with pydev, I use pycharm, Eclipse is only a secondary IDE of them.
Easy for install and more compatibility
Netbeans has full functions like tomcat, glassfish servers for web and newest features, drag and drop GUI function in install file, embed webkit to debug, javascript, templates,libs (like jquery) for php, java, javascript ... install process in Linux or Windows has wizard (very modern).
In Eclipse, only download, extract and use (with minimum demand) but need download and install server, GUI drag drop plugin for java swing plugins (must pay), and ....
Netbeans and eclipse need install jdk first but Netbeans has "Netbeans with jdk" version in Oracle website.
In ubuntu with unity, Netbeans support create launcher and stick to unity, eclipse error with menu.

Autocomplete and support code
Eclipse support autocomplete too but not as good as Netbeans. See follow.
Autocomplete expression language don't show in Eclipse but Netbeans has:

Netbeans support many shortcut key and template code better than Eclipse.
When I coding, I often use:
psvm<tab> to print lines:
public static void main(String[] args) {
}
sout<tab> to System.out.println("");
fori<tab> to for an array
forl<tab> to for an list
form<tab> to for a map
or for + ctrl space to select or view shortcut at the right.

view more in Help -> Keyboard shortcuts card.
With Eclipse, we can only do with for and ctrl+space and enter or select .
And Netbeans has some other advanced like:

In dotnet, visual studio is the best comfortable IDE , and in java, you can see image of it in Netbeans (and more).
Stable
I use Netbeans for code java, web and Eclipse for code Android. And I think Netbeans more stable than Eclipse.
Lightweight
In the past, Eclipse is more lightweight than Netbeans, but now, Eclipse is the same and after install some plugin, it is really heavy and not stable.
Sunday, 10 November 2013
Install psycopg2 with Postgresql
psycopg2 is a driver in python to connect python application with postgresql.
Install library in python, normal is easy with pip, easy_install but with psycopg2, I met errors in all linux and window.
With window, I can use this option:
http://tientuts.blogspot.com/2013/10/fix-some-errors-when-install-library.html
but with linux, when I install, this is a very common error:
After search google and try, this is my solution (in Centos):
Install postgresql in here: https://wiki.postgresql.org/wiki/Detailed_installation_guides
In present, the newest version of postgresql is 9.3 and we need setup PATH value for postgresql
Install library in python, normal is easy with pip, easy_install but with psycopg2, I met errors in all linux and window.
With window, I can use this option:
http://tientuts.blogspot.com/2013/10/fix-some-errors-when-install-library.html
but with linux, when I install, this is a very common error:
Error: pg_config executable not found.

Please add the directory containing pg_config to the PATH

or specify the full executable path with the option:


    python setup.py build_ext --pg-config /path/to/pg_config build ...


or with the pg_config option in 'setup.cfg'.

----------------------------------------
Command python setup.py egg_info failed with error code 1 in /tmp/pip-build/psycopg2
After search google and try, this is my solution (in Centos):
Install postgresql in here: https://wiki.postgresql.org/wiki/Detailed_installation_guides
In present, the newest version of postgresql is 9.3 and we need setup PATH value for postgresql
PATH=$PATH:/usr/pgsql-9.3/bin/
pip install psycopg2
Thursday, 17 October 2013
Useful MySQL commands
In window, I often use xampp to run apache and mysql, it has been integrated phpmyadmin and very easy to use with web interface. In linux, installing mysql is very easy but when i install phpmyadmin, almost i must config and search google very much, so I think i need learn some commands to use direct MySQL from terminal.
First we need install mysql, we can install from repo (so easy). And after, run mysql daemon and set password for root user:
/etc/init.d/mysqld start
mysqladmin -u root password {password}
Login to mysql
mysql -h hostname -u root -p
And now, we can use mysql with behind mysql commands.
This is a list of useful MySQL commands. Source from here
Short List of MySQL Commands
Conventions used here:
- MySQL key words are shown in CAPS
- User-specified names are in small letters
- Optional items are enclosed in square brackets [ ]
- Items in parentheses must appear in the command, along with the parentheses
- Items that can be repeated as often as desired are indicated by an ellipsis ...
Quoting in MySQL statments
- Don't quote database, table, or column names
- Don't quote column types or modifiers
- Don't quote numerical values
- Quote (single or double) non-numeric values
- Quote file names and passwords
- User names are NOT quoted in GRANT or REVOKE statements, but they are quoted in other statements.
| General Commands | |
|---|---|
| USE database_name | |
| Change to this database. You need to change to some database when you first connect to MySQL. | |
| SHOW DATABASES | |
| Lists all MySQL databases on the system. | |
| SHOW TABLES [FROM database_name] | |
| Lists all tables from the current database or from the database given in the command. | |
| DESCRIBE table_name | |
| SHOW FIELDS FROM table_name | |
| SHOW COLUMNS FROM table_name | |
| These commands all give a list of all columns (fields) from the given table, along with column type and other info. | |
| SHOW INDEX FROM table_name | |
| Lists all indexes from this tables. | |
| SET PASSWORD=PASSWORD('new_password') | |
| Allows the user to set his/her own password. | |
| Table Commands | |
| CREATE TABLE table_name (create_clause1, create_clause2, ...) | |
| Creates a table with columns as indicated in the create clauses. | |
| create_clause | |
| column name followed by column type, followed optionally by modifiers. For example, "gene_id INT AUTO_INCREMENT PRIMARY KEY" (without the quotes) creates a column of type integer with the modifiers described below. | |
| create_clause modifiers | |
| |
| DROP TABLE table_name | |
| Removes the table from the database. Permanently! So be careful with this command! | |
| ALTER TABLE table_name ADD (create_clause1, create_clause2, ...) | |
| Adds the listed columns to the table. | |
| ALTER TABLE table_name DROP column_name | |
| Drops the listed columns from the table. | |
| ALTER TABLE table_name MODIFY create_clause | |
| Changes the type or modifiers to a column. Using MODIFY means that the column keeps the same name even though its type is altered. MySQL attempts to convert the data to match the new type: this can cause problems. | |
| ALTER TABLE table_name CHANGE column_name create_clause | |
| Changes the name and type or modifiers of a column. Using CHANGE (instead of MODIFY) implies that the column is getting a new name. | |
| ALTER TABLE table_name ADD INDEX [index_name] (column_name1, column_name2, ...) | |
| CREATE INDEX index_name ON table_name (column_name1, column_name2, ...) | |
| Adds an index to this table, based on the listed columns. Note that the order of the columns is important, because additional indexes are created from all subsets of the listed columns reading from left to write. The index name is optional if you use ALTER TABLE, but it is necesary if you use CREATE INDEX. Rarely is the name of an index useful (in my experience). | |
| Data Commands | |
| INSERT [INTO] table_name VALUES (value1, value2, ...) | |
| Insert a complete row of data, giving a value (or NULL) for every column in the proper order. | |
| INSERT [INTO] table_name (column_name1, column_name2, ...) VALUES (value1, value2, ...) | |
| INSERT [INTO] table_name SET column_name1=value1, column_name2=value2, ... | |
| Insert data into the listed columns only. Alternate forms, with the SET form showing column assignments more explicitly. | |
| INSERT [INTO] table_name (column_name1, column_name2, ...) SELECT list_of_fields_from_another_table FROM other_table_name WHERE where_clause | |
| Inserts the data resulting from a SELECT statement into the listed columns. Be sure the number of items taken from the old table match the number of columns they are put into! | |
| DELETE FROM table_name WHERE where_clause | |
| Delete rows that meet the conditions of the where_clause. If the WHERE statement is omitted, the table is emptied, although its structure remains intact. | |
| UPDATE table_name SET column_name1=value1, column_name2=value2, ... [WHERE where_clause] | |
| Alters the data within a column based on the conditions in the where_clause. | |
| LOAD DATA LOCAL INFILE 'path to external file' INTO TABLE table_name | |
| Loads data from the listed file into the table. The default assumption is that fields in the file are separated by tabs, and each data record is separated from the others by a newline. It also assumes that nothing is quoted: quote marks are considered to be part of the data. Also, it assumes that the number of data fields matches the number of table columns. Columns that are AUTO_INCREMENT should have NULL as their value in the file. | |
| LOAD DATA LOCAL INFILE 'path to external file' [FIELDS TERMINATED BY 'termination_character'] [FIELDS ENCLOSED BY 'quoting character'] [LINES TERMINATED BY 'line termination character'] FROM table_name | |
| Loads data from the listed file into the table, using the field termination character listed (default is tab \t), and/or the listed quoting character (default is nothing), and/or the listed line termination chacracter (default is a newline \n). | |
| SELECT column_name1, column_name2, ... INTO OUTFILE 'path to external file' [FIELDS TERMINATED BY 'termination_character'] [FIELDS ENCLOSED BY 'quoting character'] [LINES TERMINATED BY 'line termination character'] FROM table_name [WHERE where_clause] | |
Allows you to move data from a table into an
external file. The field and line termination clauses are the same as
for LOAD above. Several tricky features:
| |
| Privilege Commands | |
| Most of the commands below require MySQL root access | |
| GRANT USAGE ON *.* TO user_name@localhost [IDENTIFIED BY 'password'] | |
| Creates a new user on MySQL, with no rights to do anything. The IDENTIFED BY clause creates or changes the MySQL password, which is not necessarily the same as the user's system password. The @localhost after the user name allows usage on the local system, which is usually what we do; leaving this off allows the user to access the database from another system. User name NOT in quotes. | |
| GRANT SELECT ON *.* TO user_name@localhost | |
| In general, unless data is supposed to be kept private, all users should be able to view it. A debatable point, and most databases will only grant SELECT privileges on particular databases. There is no way to grant privileges on all databses EXCEPT specifically enumerated ones. | |
| GRANT ALL ON database_name.* TO user_name@localhost | |
| Grants permissions on all tables for a specific database (database_name.*) to a user. Permissions are for: ALTER, CREATE, DELETE, DROP, INDEX, INSERT, SELECT, UPDATE. | |
| FLUSH PRIVILEGES | |
| Needed to get updated privileges to work immediately. You need RELOAD privileges to get this to work. | |
| SET PASSWORD=PASSWORD('new_password') | |
| Allows the user to set his/her own password. | |
| REVOKE ALL ON [database_name.]* FROM user_name@localhost | |
| Revokes all permissions for the user, but leaves the user in the MySQL database. This can be done for all databases using "ON *", or for all tables within a specific databse, using "ON database_name.*". | |
| DELETE FROM mysql.user WHERE user='user_name@localhost' | |
| Removes the user from the database, which revokes all privileges. Note that the user name is in quotes here. | |
| UPDATE mysql.user SET password=PASSWORD('my_password') WHERE user='user_name' | |
| Sets the user's password. The PASSWORD function encrypts it; otherwise it will be in plain text. | |
| SELECT user, host, password, select_priv, insert_priv, shutdown_priv, grant_priv FROM mysql.user | |
| A good view of all users and their approximate privileges. If there is a password, it will by an encrytped string; if not, this field is blank. Select is a very general privlege; insert allows table manipulation within a database; shutdown allows major system changes, and should only be usable by root; the ability to grant permissions is separate from the others. | |
| SELECT user, host, db, select_priv, insert_priv, grant_priv FROM mysql.db | |
| View permissions for individual databases. | |
Thursday, 26 September 2013
Opsview, a good monitor system base on Nagios
After studying Nagios a period of time, I met Opsview and really like it and want to share it for every body by post an article to this blog.
What is Opsview?
Opsview like Nagios with useful plugins with a nice web interface and easy to config and install.
Nagios is a powerful monitor system but Nagios Core (free) has a basic web interface, almost to read only, to config hosts or options, we need write to files an reload service, database base on text format. Nagios core can't do any think if it stand alone, we must install plugin for check, graph (pnp4nagios, nagiosgraph...) for show status display graphs ... And really hard for install, studying and training newbies.
Opsview Core free.
What can Opview do ?
Opsview is built with the following technologies:
What is Opsview?
Opsview like Nagios with useful plugins with a nice web interface and easy to config and install.
Nagios is a powerful monitor system but Nagios Core (free) has a basic web interface, almost to read only, to config hosts or options, we need write to files an reload service, database base on text format. Nagios core can't do any think if it stand alone, we must install plugin for check, graph (pnp4nagios, nagiosgraph...) for show status display graphs ... And really hard for install, studying and training newbies.
Opsview Core free.
What can Opview do ?
Opsview is built with the following technologies:
- Nagios Core: Provides the core set of monitoring and alerting capabilities in Opsview. Sometimes referred to as Opsview's monitoring engine. Many plugin in Nagios is compatible with Opsview
- Nice web interface: comfortable, easy to use, easy to remember, easy to learn and traning
- MySQL: A relational database used for configuration, runtime and data warehouse databases
- RRDtool: Provides lightweight graphing
- More extend agent
- ...
Saturday, 21 September 2013
Snapshot function in Virtualbox (backup many status of os)
Virtualbox is a free, opensource virtual pc software. Beside Virtualbox, we can use many other free softwares like qemu, vmware player ... but i think virtualbox is the best because it is nice, power, can connect with gns3 to simulate network systems (qemu can still connect but not power like virtualbox).
In the simplest way, we use Virtual pc software with an iso image file of an operating system to install and run the operating system (OS) in a window to test or run certain tools that the operating system on pc / laptop does not currently do. But virtual pc softwares have many more powerful functions than it and Snapshot is one.
With a real pc/laptop, I use softwares like norton ghost, true image ... to backup OS. I must restart PC with a boot pc and configure to backup to an image file. I need about near half of hour for each time.
With virtualbox, before, I can backup file vdi by compress this to a archive file. I really happy with each time, I only need back in less than ten minutes.
But, with snapshot, I can do them with < one minutes, can backup in running, save memory, and can struct in a tree to manager snapshots.

To use it, we need click snapshot button (blue arrow)
Create snapshot (red arrow), we can do it when virtual pc is running.
And can clone this state to other virtual pc with button in black arror.
Choose status you want to restore, and click restore button near create button.
Very easy, very powerful. When i try softwares, special in linux (hard to install softwares), this function help me very good.
In the simplest way, we use Virtual pc software with an iso image file of an operating system to install and run the operating system (OS) in a window to test or run certain tools that the operating system on pc / laptop does not currently do. But virtual pc softwares have many more powerful functions than it and Snapshot is one.
With a real pc/laptop, I use softwares like norton ghost, true image ... to backup OS. I must restart PC with a boot pc and configure to backup to an image file. I need about near half of hour for each time.
With virtualbox, before, I can backup file vdi by compress this to a archive file. I really happy with each time, I only need back in less than ten minutes.
But, with snapshot, I can do them with < one minutes, can backup in running, save memory, and can struct in a tree to manager snapshots.

To use it, we need click snapshot button (blue arrow)
Create snapshot (red arrow), we can do it when virtual pc is running.
And can clone this state to other virtual pc with button in black arror.
Choose status you want to restore, and click restore button near create button.
Very easy, very powerful. When i try softwares, special in linux (hard to install softwares), this function help me very good.
Friday, 13 September 2013
Scapy, a power network tool for Python
When working, I must meet some project with create pakage, pppoe, ping, catch, filter, authentication ... And I was introduced to learn to use scapy.
Scapy is a power opensource library/app for python.
Homepage: http://www.secdev.org/projects/scapy/
Scapy is a power opensource library/app for python.
Homepage: http://www.secdev.org/projects/scapy/
First project I met is pppoe with pap/chap authentication to connect to some bras, server and Scapy support it with automata (advanced function of scapy).
You can see here to know pppoe:
And this is a code
Chap authen
and we can use scapy with other protocols. At the present, I am not sure about Scapy, so you can go to http://networkingbodges.blogspot.com or homepage of scapy to get more information.
Friday, 30 August 2013
Create a simple Nagios plugin support graph (passive check)
First, to know this article, please read and practice active check in here.
Config passive check
Config with nagios core:
Manual passive check
Create a plugin like active check article but in define service add two lines:
Restart nagios:
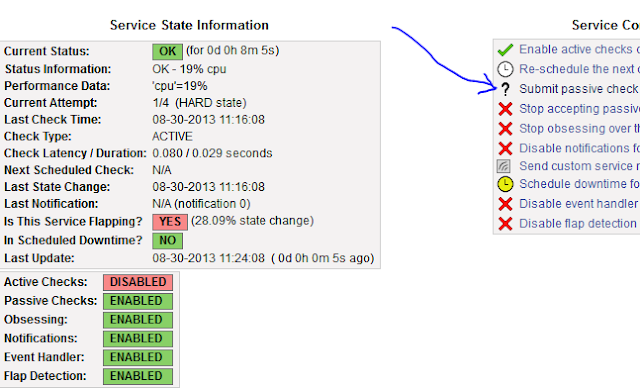
Click Submit passive check and fill it like this image:

refresh nagios webpage and wait few seconds and view Status information:

Other way:
Structure:

Passive check from remote host
Nagios server (ip: 192.168.0.221)
Install
Client (ip: 192.168.0.33)
Install:
Check
You can see in active check article to see how to create graph.
Config passive check
Config with nagios core:
vi /usr/local/nagios/etc/nagios.cfgaccept_passive_service_checks option is set to 1 as well.
Manual passive check
Create a plugin like active check article but in define service add two lines:
active_checks_enabled 0
passive_checks_enabled 1
Restart nagios:
sudo -sThis is the result:
service nagios restart
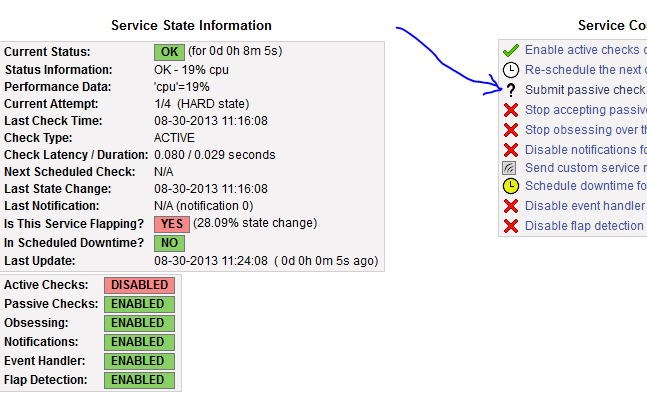
Click Submit passive check and fill it like this image:
refresh nagios webpage and wait few seconds and view Status information:
Other way:
Structure:
[<timestamp>] PROCESS_SERVICE_CHECK_RESULT;<host_name>;<service_description>;<service_status>;<plugin_output>Example:
sudo -s
CHECK="[`date +%s`] PROCESS_SERVICE_CHECK_RESULT;localhost2;Check cpu;0;Ok from commandline"
echo $CHECK >>/usr/local/nagios/var/rw/nagios.cmd
Passive check from remote host
Nagios server (ip: 192.168.0.221)
Install
sudo -sEdit nsca config:
apt-get install nsca
vi /etc/nsca.cfg
Content to change (if different), can change password to anythink you like but must match client and server:
Restart nscacommand_file=/usr/local/nagios/var/rw/nagios.cmdpassword=alohadecryption_method=1
nsca_group=nagios
nsca_user=nagios
service nsca restart
Client (ip: 192.168.0.33)
Install:
sudo -sConfig:
apt-get install nsca-client
vi /etc/send_nsca.cfgchange password and encryption_method like server
Check
Result Ok, but nagios don't do any think.echo -en "localhost2\tcheck cpu\t0\tCheck Ok from nsca\n" | send_nsca -c /etc/send_nsca.cfg -H 192.168.0.221
1 data packet(s) sent to host successfully.Debug:
vi /usr/local/nagios/var/nagios.log
and this is the reason:[1377855543] EXTERNAL COMMAND: PROCESS_SERVICE_CHECK_RESULT;localhost2;check cpu;0;Check111 Ok from nsca[1377855543] Warning: Passive check result was received for service 'check cpu' on host 'localhost2', but the service could not be found!
echo -en "localhost2\tCheck cpu\t0\tCheck Ok from nsca\n" | send_nsca -c /etc/send_nsca.cfg -H 192.168.0.221Wait for few seconds and data will be update in nagios.
You can see in active check article to see how to create graph.
Tuesday, 27 August 2013
Create a simple Nagios plugin support graph (active check)
In this article, I will post an example of a Nagios plugin support graph.
First, you must install Nagios core and pnp4nagios (I suggest you install like these article because other ways can make some differences).
This code is written by Python, will make random number and return result. You can do with any language can return the same result.
Create plugin
Code
Example result
Create file
cd /home/
vi plugin.py ( paste code in vi editor)
chmod 777 plugin.py
Check result
./plugin.py -> UKNOWN - 111% cpu|'cpu'=111%
Config in Nagios (local)
Create a host with service use our plugin
cd /usr/local/nagios/etc
vi test.cfg
paste this content
vi /usr/local/nagios/etc/nagios.cfg
and this line
Check config error and restart
/usr/local/nagios/bin/nagios -v /usr/local/nagios/etc/nagios.cfg
service nagios restart
Result
And this is the result:

Click to check cpu:
 You can see Status information and Performance Data , this is the result of above red plugin result
Graph will be created from Performance Data with this struct: 'label'=value[UOM];[warn];[crit];[min];[max]
See more here: http://nagiosplug.sourceforge.net/developer-guidelines.html
Wait about half of hour or more, and this is my plugin graph :

Config from remote host, via nrpe:
Install in client (ip: 192.168.0.33)
apt-get install -y python nagios-nrpe-server
Disable nagios3 service
Because I use nagios from source (not nagios3 - dependences of nagios-nrpe-server), so, to disable (to get server lighter), we need:
Install and check
client:
create plugin.py at /home/plugin.py like above at client
Config
vi /etc/nagios/nrpe.cfg
add any monitor service or host can get infor at allowed_hosts:
Install in server (ip: 192.168.0.222)
sudo apt-get install nagios-nrpe-plugin
Check nrpe
With this command, you can change command in above local config to check remote host.
In fact, we usually use command like:
Go to document of nagios to view more.
First, you must install Nagios core and pnp4nagios (I suggest you install like these article because other ways can make some differences).
This code is written by Python, will make random number and return result. You can do with any language can return the same result.
Create plugin
Code
#!/usr/bin/python
import os, sys, random

random = random.randrange(0, 120)

if random < 50:
        print "OK - %s%% cpu|'cpu'=%s%%" % (random, random)
        sys.exit(0)
elif random < 90 and random >= 50:
        print "WARNING - %s%% cpu|'cpu'=%s%%" % (random, random)
        sys.exit(1)
elif random <= 100 and random >= 90:
        print "CRITICAL - %s%% cpu|'cpu'=%s%%" % (random, random)
        sys.exit(2)
else:
        print "UKNOWN - %s%% cpu|'cpu'=%s%%" % (random, random)
        sys.exit(3)
Example result
OK - 47% cpu|'cpu'=47%
Create file
cd /home/
vi plugin.py ( paste code in vi editor)
chmod 777 plugin.py
Check result
./plugin.py -> UKNOWN - 111% cpu|'cpu'=111%
Config in Nagios (local)
Create a host with service use our plugin
cd /usr/local/nagios/etc
vi test.cfg
paste this content
define host{
use linux-server,host-pnp ; Name of host template to use
; This host definition will inherit all variables that are defined
; in (or inherited by) the linux-server host template definition.
host_name localhost2
alias localhost2
address 127.0.0.1
}
define service{
use local-service,service-pnp ; Name of service template to use
host_name localhost2
service_description Check cpu
check_command check_cpu
}
define command{
command_name check_cpu
command_line /home/plugin.py
}
vi /usr/local/nagios/etc/nagios.cfg
and this line
cfg_file=/usr/local/nagios/etc/test.cfg
Check config error and restart
/usr/local/nagios/bin/nagios -v /usr/local/nagios/etc/nagios.cfg
service nagios restart
Result
And this is the result:
Click to check cpu:
Graph will be created from Performance Data with this struct: 'label'=value[UOM];[warn];[crit];[min];[max]
See more here: http://nagiosplug.sourceforge.net/developer-guidelines.html
Wait about half of hour or more, and this is my plugin graph :

Config from remote host, via nrpe:
Install in client (ip: 192.168.0.33)
apt-get install -y python nagios-nrpe-server
Disable nagios3 service
Because I use nagios from source (not nagios3 - dependences of nagios-nrpe-server), so, to disable (to get server lighter), we need:
update-rc.d nagios3 disable (for disable service startup with server)
service nagios3 stop (to stop running service)
update-rc.d nagios3 enable (for enable service startup)
Install and check
client:
create plugin.py at /home/plugin.py like above at client
Config
vi /etc/nagios/nrpe.cfg
add any monitor service or host can get infor at allowed_hosts:
allowed_hosts=127.0.0.1,192.168.0.222add this plugin command:
command[check_cpu]=/home/plugin.pySave config file and restart
service nagios-nrpe-server restart
Install in server (ip: 192.168.0.222)
sudo apt-get install nagios-nrpe-plugin
Check nrpe
/usr/lib/nagios/plugins/check_nrpe -H 192.168.0.33 -c check_cpuAnd this is the result:
WARNING - 69% cpu|'cpu'=69%
With this command, you can change command in above local config to check remote host.
In fact, we usually use command like:
/usr/lib/nagios/plugins/check_nrpe -H $HOSTADDRESS$ -c $ARG1$and check_command like:
check_cpu!check_cpuwith ip will be replaced in $HOSTADDRESS$ and check_cpu after ! will be replaced in $ARG1$.
Go to document of nagios to view more.
Tuesday, 20 August 2013
Check_MK, one of the best plugin for Nagios
Check_MK is a collection of extensions for the IT-Monitoring-Kernel of Nagios and together with this, and ideally also with PNP4Nagios and NagVis constitutes a complete IT-Monitoring-System. Check_MK is 100% Open-Source and is available under the terms of the GNU GPL.
View homepage to get full information:
http://mathias-kettner.com
First must install nagios: view here
After download and extract from :
http://mathias-kettner.com/check_mk_download.html
Install
Must install libapache2-mod-python first.
Go to extracted folder in terminal.
sudo -s
./setup.sh
Next next next and next.
setup progress will auto detect elements.

Type y, Enter
Restart nagios and apache2 services
service nagios restart
service apache2 restart
This is the result (image from wiki):

Error when run
When I restart linux, having an error
View homepage to get full information:
http://mathias-kettner.com
First must install nagios: view here
After download and extract from :
http://mathias-kettner.com/check_mk_download.html
Install
Must install libapache2-mod-python first.
Go to extracted folder in terminal.
sudo -s
./setup.sh
Next next next and next.
setup progress will auto detect elements.

Type y, Enter
Restart nagios and apache2 services
service nagios restart
service apache2 restart
This is the result (image from wiki):

Error when run
When I restart linux, having an error
"Livestatus problem: Cannot connect to 'unix:/usr/local/nagios/var/rw/live': [Errno 111] Connection refused"This is because pemission, use commands:
chown nagios.nagcmd /usr/local/nagios/var/rw
chmod g+rwx /usr/local/nagios/var/rw
chmod g+s /usr/local/nagios/var/rw
Install graph plugin for Nagios (pnp4nagios)
This article will install pnp4nagios plugin for nagios install from source: see here
Go to web, download and extract source code:
http://sourceforge.net/projects/pnp4nagios/
SETUP
Go to superuser mode
sudo -s
install rrdtool and RRDs Perl Modules (dependences for pnp4nagios)
apt-get install libcgi-pm-perl librrds-perl libgd-gd2-perl libnagios-object-perl rrdtool
Download and extract (in present this is the lastest version)
cd ~/downloads (if not exists: mkdir downloads)
wget http://sourceforge.net/projects/pnp4nagios/files/PNP-0.6/pnp4nagios-0.6.21.tar.gz
tar -xzvf pnp4nagios-0.6.21.tar.gz
Compile and Install
cd pnp4nagios-0.6.21/
./configure
make all
make fullinstall
Restart nagios and apache2 services
service nagios restart
service apache2 restart
FIX ERRORS
go to 127.0.0.1/pnp4nagios
and see like this image:

Fix:
Config
Still go to terminal: sudo nautilus.
Go to /usr/local/nagios/etc/nagios.cfg,
Change default fields to this content:
Go to /usr/local/nagios/etc/objects/commands.cfg, append the command definitions:
Append two entries to /usr/local/nagios/etc/objects/templates.cfg:
Restart nagios and apache2 services like aboves and we will see graph icon in hosts and services was added template.
This is the result:

Go to web, download and extract source code:
http://sourceforge.net/projects/pnp4nagios/
SETUP
Go to superuser mode
sudo -s
install rrdtool and RRDs Perl Modules (dependences for pnp4nagios)
apt-get install libcgi-pm-perl librrds-perl libgd-gd2-perl libnagios-object-perl rrdtool
Download and extract (in present this is the lastest version)
cd ~/downloads (if not exists: mkdir downloads)
wget http://sourceforge.net/projects/pnp4nagios/files/PNP-0.6/pnp4nagios-0.6.21.tar.gz
tar -xzvf pnp4nagios-0.6.21.tar.gz
Compile and Install
cd pnp4nagios-0.6.21/
./configure
make all
make fullinstall
Restart nagios and apache2 services
service nagios restart
service apache2 restart
FIX ERRORS
go to 127.0.0.1/pnp4nagios
and see like this image:

Fix:
a2enmod rewriteand do like info in below webpage:
/etc/init.d/apache2 restart (like service apache2 restart)
Your environment passed all requirements. Remove or rename the /usr/local/pnp4nagios/share/install.php file now.go to terminal: sudo nautilus -> go to this page and rename file
Config
Still go to terminal: sudo nautilus.
Go to /usr/local/nagios/etc/nagios.cfg,
Change default fields to this content:
process_performance_data=1
host_perfdata_file=/usr/local/pnp4nagios/var/host-perfdata
service_perfdata_file=/usr/local/pnp4nagios/var/service-perfdata
host_perfdata_file_template=DATATYPE::HOSTPERFDATA\tTIMET::$TIMET$\tHOSTNAME::$HOSTNAME$\tHOSTPERFDATA::$HOSTPERFDATA$\tHOSTCHECKCOMMAND::$HOSTCHECKCOMMAND$\tHOSTSTATE::$HOSTSTATE$\tHOSTSTATETYPE::$HOSTSTATETYPE$\tHOSTOUTPUT::$HOSTOUTPUT$
service_perfdata_file_template=DATATYPE::SERVICEPERFDATA\tTIMET::$TIMET$\tHOSTNAME::$HOSTNAME$\tSERVICEDESC::$SERVICEDESC$\tSERVICEPERFDATA::$SERVICEPERFDATA$\tSERVICECHECKCOMMAND::$SERVICECHECKCOMMAND$\tHOSTSTATE::$HOSTSTATE$\tHOSTSTATETYPE::$HOSTSTATETYPE$\tSERVICESTATE::$SERVICESTATE$\tSERVICESTATETYPE::$SERVICESTATETYPE$\tSERVICEOUTPUT::$SERVICEOUTPUT$
host_perfdata_file_mode=a
service_perfdata_file_mode=a
host_perfdata_file_processing_interval=15
service_perfdata_file_processing_interval=15
host_perfdata_file_processing_command=process-host-perfdata-file
service_perfdata_file_processing_command=process-service-perfdata-file
Go to /usr/local/nagios/etc/objects/commands.cfg, append the command definitions:
define command {go to /usr/local/pnp4nagios/etc/ , rename rra.cfg-sample files to rra.cfg.
command_name process-service-perfdata-file
command_line /usr/local/pnp4nagios/libexec/process_perfdata.pl --bulk=/usr/local/pnp4nagios/var/service-perfdata
}
define command {
command_name process-host-perfdata-file
command_line /usr/local/pnp4nagios/libexec/process_perfdata.pl --bulk=/usr/local/pnp4nagios/var/host-perfdata
}
Append two entries to /usr/local/nagios/etc/objects/templates.cfg:
define host {Add above templates to any host or service you want like I change /usr/local/nagios/etc/objects/localhost.cfg
name host-pnp
action_url /pnp4nagios/index.php/graph?host=$HOSTNAME$&srv=_HOST_
register 0
}
define service {
name service-pnp
action_url /pnp4nagios/index.php/graph?host=$HOSTNAME$&srv=$SERVICEDESC$
register 0
}
.......
define host{
use linux-server,host-pnp ; Name of host template to use
; This host definition will inherit all variables that are defined
; in (or inherited by) the linux-server host template definition.
host_name localhost
alias localhost
address 127.0.0.1
}
......
define service{
use local-service,service-pnp ; Name of service template to use
host_name localhost
service_description PING
check_command check_ping!100.0,20%!500.0,60%
}
........
Restart nagios and apache2 services like aboves and we will see graph icon in hosts and services was added template.
This is the result:
Friday, 16 August 2013
Tip to improve autocomplete unknow variables in python with pydev
See this article first.
Python use dynamic type, so IDE can unknow variable in some cases like if you want autocomplete string type:
I know some ways to solve:
Using assert and isinstance
Cast the object/variable back to its type
New on PyDev 2.8.0
http://pydev.org/manual_adv_type_hints.html
Example:
or you can autocomple If write two charactor, this will autocomplete in all classes
Python use dynamic type, so IDE can unknow variable in some cases like if you want autocomplete string type:
a.Ctrl+space and pydev don't show any thing.
I know some ways to solve:
Using assert and isinstance
import string

def fun1(a):
    a = string(a)
    a.

fun1("hello")
Cast the object/variable back to its type
import string

def fun1(a):
    a = string(a)
    a.

fun1("hello")
New on PyDev 2.8.0
http://pydev.org/manual_adv_type_hints.html
Example:
import string

def fun1(a):
    '@type a: string'
    a.

fun1("hello")
or you can autocomple If write two charactor, this will autocomplete in all classes
Wednesday, 14 August 2013
Install Nagios and monitor tools in Ubuntu (and other Linux distros) with setup file
Install Nagios is hard with newbie and install others tools make our must spend much time. But now, we can do it very easy with OMD - The Open Monitoring Distribution
I will present how to install in ubuntu 13.04.
Note

after change regional format, need logout or restart to apply.
Install and configure OMD
1. Download omd from http://omdistro.org/download or add repositories.
2. Go to terminal and update list packages:
5. Go to website:
And go to omdistro.org , nagios and other tools website to read how to use them.
Note:
In ubuntu 13.04, having some error in check_mk user interface.I think install from source is better:
http://tientuts.blogspot.com/2013/08/install-nagios-in-ubuntu-1304-32bit.html
I will present how to install in ubuntu 13.04.
Note
- Must change ubuntu to main repo (some other repo can make some dependence errors)

- Must change

after change regional format, need logout or restart to apply.
Install and configure OMD
1. Download omd from http://omdistro.org/download or add repositories.
2. Go to terminal and update list packages:
sudo -s3. Install omd file (or can install from repo with apt-get install ..)
apt-get update
dpkg -i <file_name>4. Create first website:
omd create mysite
omd start
5. Go to website:
http://127.0.0.1/mysitewith username: omdadmin and pass: omd
And go to omdistro.org , nagios and other tools website to read how to use them.
Note:
In ubuntu 13.04, having some error in check_mk user interface.I think install from source is better:
http://tientuts.blogspot.com/2013/08/install-nagios-in-ubuntu-1304-32bit.html
Tuesday, 13 August 2013
Install Nagios in ubuntu 13.04 32bit from source
Nagios core is an opensource system to monitor many things in network. Nagios offers monitoring and alerting services for servers, switches,
applications, and services. It alerts the users when things go wrong and
alerts them a second time when the problem has been resolved.
Because it free, opensource and easy to custom, many companies have applied it to monitor your system.
Today, I will present how to install nagios in ubuntu 13.04 32bit.
This article used information in Quickstart Installation Guides in nagios documents
Preconfigure
Must change regional format to English or will having errors in some plugin like check_mk:
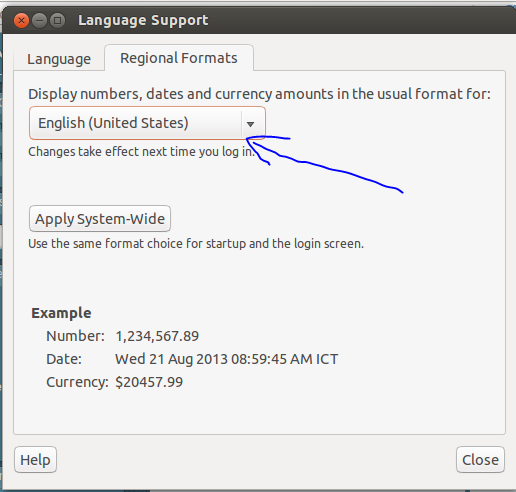
Some package in my countries Ubuntu repo don't support some packages like openssh-service. Please use main repo.
Change with command line, use: https://help.ubuntu.com/community/Locale
Setup
Go to superuser mode
sudo -s
Install dependencies
apt-get update
apt-get install build-essential apache2 php5-gd wget libgd2-xpm libgd2-xpm-dev libapache2-mod-php5 libssl-dev libapache2-mod-python -y
Create Account Information
/usr/sbin/useradd -m -s /bin/bash nagios
passwd nagios
/usr/sbin/groupadd nagcmd
/usr/sbin/usermod -a -G nagcmd nagios
/usr/sbin/usermod -a -G nagcmd www-data
Download and extract files
mkdir ~/downloads
cd ~/downloads
wget http://sourceforge.net/projects/nagios/files/nagios-3.x/nagios-3.5.0/nagios-3.5.0.tar.gz
wget http://sourceforge.net/projects/nagiosplug/files/nagiosplug/1.4.16/nagios-plugins-1.4.16.tar.gz
tar -xzvf nagios-3.5.0.tar.gz
tar -zxvf nagios-plugins-1.4.16.tar.gz
Compile and Install Nagios
cd nagios/
./configure --with-command-group=nagcmd --enable-event-broker
make all
make install
make install-init
make install-config
make install-commandmode
Configure the Web Interface
make install-webconf
htpasswd -c /usr/local/nagios/etc/htpasswd.users nagiosadmin
/etc/init.d/apache2 reload
Compile and Install Nagios plugin
cd ~/downloads
cd nagios-plugins-1.4.16/
./configure --with-nagios-user=nagios --with-nagios-group=nagios
make
Error and fix (Important)
when make with new linux distro like ubuntu 13.04 or centos 6.4 (don't appear in ubuntu 12.04), I met this error, view image:

go to gl folder of nagios-plugin , go to stdio.h file (must make to get this file), search gets.
And you will see the line like this:
Continue compile and Install Nagios plugin
cd ~/downloads/nagios-plugins-1.4.16/
make
make install
Start Nagios and set startup
ln -s /etc/init.d/nagios /etc/rcS.d/S99nagios
/usr/local/nagios/bin/nagios -v /usr/local/nagios/etc/nagios.cfg
/etc/init.d/nagios start
Login to the Web Interface
http://localhost/nagios/
or http://127.0.0.1/nagios/
username: nagiosadmin
Install ssh server
sudo apt-get install openssh-server
to ssh from other pc
Install more plugins
apt-get install nagios-plugins*
folder of plugins:
/usr/local/nagios/libexec (from source)
/usr/lib/nagios/plugins (from apt-get)
Because it free, opensource and easy to custom, many companies have applied it to monitor your system.
Today, I will present how to install nagios in ubuntu 13.04 32bit.
This article used information in Quickstart Installation Guides in nagios documents
Preconfigure
Must change regional format to English or will having errors in some plugin like check_mk:
Some package in my countries Ubuntu repo don't support some packages like openssh-service. Please use main repo.
Change with command line, use: https://help.ubuntu.com/community/Locale
Setup
Go to superuser mode
sudo -s
Install dependencies
apt-get update
apt-get install build-essential apache2 php5-gd wget libgd2-xpm libgd2-xpm-dev libapache2-mod-php5 libssl-dev libapache2-mod-python -y
Create Account Information
/usr/sbin/useradd -m -s /bin/bash nagios
passwd nagios
/usr/sbin/groupadd nagcmd
/usr/sbin/usermod -a -G nagcmd nagios
/usr/sbin/usermod -a -G nagcmd www-data
Download and extract files
mkdir ~/downloads
cd ~/downloads
wget http://sourceforge.net/projects/nagios/files/nagios-3.x/nagios-3.5.0/nagios-3.5.0.tar.gz
wget http://sourceforge.net/projects/nagiosplug/files/nagiosplug/1.4.16/nagios-plugins-1.4.16.tar.gz
tar -xzvf nagios-3.5.0.tar.gz
tar -zxvf nagios-plugins-1.4.16.tar.gz
Compile and Install Nagios
cd nagios/
./configure --with-command-group=nagcmd --enable-event-broker
make all
make install
make install-init
make install-config
make install-commandmode
Configure the Web Interface
make install-webconf
htpasswd -c /usr/local/nagios/etc/htpasswd.users nagiosadmin
/etc/init.d/apache2 reload
Compile and Install Nagios plugin
cd ~/downloads
cd nagios-plugins-1.4.16/
./configure --with-nagios-user=nagios --with-nagios-group=nagios
make
Error and fix (Important)
when make with new linux distro like ubuntu 13.04 or centos 6.4 (don't appear in ubuntu 12.04), I met this error, view image:

go to gl folder of nagios-plugin , go to stdio.h file (must make to get this file), search gets.
And you will see the line like this:
_GL_WARN_ON_USE (gets, "gets is a security hole - use fgets instead");change gets to fgets.
Continue compile and Install Nagios plugin
cd ~/downloads/nagios-plugins-1.4.16/
make
make install
Start Nagios and set startup
ln -s /etc/init.d/nagios /etc/rcS.d/S99nagios
/usr/local/nagios/bin/nagios -v /usr/local/nagios/etc/nagios.cfg
/etc/init.d/nagios start
Login to the Web Interface
http://localhost/nagios/
or http://127.0.0.1/nagios/
username: nagiosadmin
Install ssh server
sudo apt-get install openssh-server
to ssh from other pc
Install more plugins
apt-get install nagios-plugins*
folder of plugins:
/usr/local/nagios/libexec (from source)
/usr/lib/nagios/plugins (from apt-get)
Friday, 9 August 2013
Read microsoft office documents in Linux
Default of distros of linux are open source offices like libreoffice, koffice, abioffice ... but all of them reading doc, docx, xls, xlsx ... files are not very well. Today, I will present some solutions better.
Kingsoft Office

Home page: http://wps-community.org/ or http://www.kingsoftstore.com
It is the office productivity suite having free and pro versions, but with only free version, I can read ms office formats much better than libreoffice (what I am using). Besides, It is small, can download for offline install, run fast and user interface very like ms office, you can use without any difficulty.
Skydriver
 Skydriver is an free store service of microsoft office with 7gb online. And it support read ms office formats perfectly. However, when you edit documents, it has many limit when compare with MS office offline in window.
OthersTo get full of power of ms office, you can do other solutions like:
Kingsoft Office

Home page: http://wps-community.org/ or http://www.kingsoftstore.com
It is the office productivity suite having free and pro versions, but with only free version, I can read ms office formats much better than libreoffice (what I am using). Besides, It is small, can download for offline install, run fast and user interface very like ms office, you can use without any difficulty.
Skydriver

OthersTo get full of power of ms office, you can do other solutions like:
- Install MS office in window in virtual machine (vmware, virtualbox ..)
- Install MS office via crossover (wine). Crossover is shareware but support install MS office in linux good and easy.
Subscribe to:
Posts (Atom)